|
Making Paper Beads written and samples by Wendy Kerr
Reprinted from the Web
Don't have the beads to go with your current project? Why not make your
own!
What you need...
Text weight paper
Inkpads
Beads
PPA (Perfect Paste Adhesive) or glue
Clear Nail polish or Perm Enamel
How to:
Cut a length of your paper to 1/2"
Wrap around a thin paintbrush to make the bead base.
Secure the flap with PPA or glue
With a thin paintbrush, brush PPA on the INSIDE of
your bead as well as the top and bottom to help secure.
Paint and decorate as desired.
You can also decorate your paper before wrapping it; Direct to Paper (DTP)
with inkpads, color with markers, just about anything!
When done, coat with clear nail polish or Perm Enamel to protect your work. I
always go over my attached beads as well, to prevent them from coming off.
Experiment with: different paper widths and length, paints, inkpads, markers
and more!
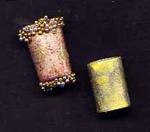
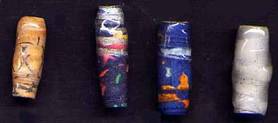
Left: Made by DTP with a Stained Glass Dye Inkpad; DTP with gold
and brown cat's eyes; painted with sheer gold acrylic paint; attached beads
to top and bottom with perm enamel; coat entire piece with nail polish.
Right: Painted with yellow metallic paint; tap a silver leafing pen
around; before leafing pen dries, apply one coat of nail polish - this will
feather out the silver; let dry; paint with perm enamel to seal.

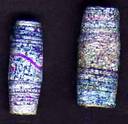
Left: 1" strip of paper, cut bottom 1/2 of paper strip
at an angle to make a point (see picture above); DTP with stained glass
inkpad; color edges of paper - one side silver, the other purple; Make purple
squiggly lines and dots along paper; wrap to make bead; color top and bottom
of bead with silver leafing pen; add a few small silver beads.
Right: Same as at left, except cover with a layer of Perm Enamel
and add clear beads to the entire beads; once dry add more Perm Enamel to
prevent beads from coming off.
 Close
up of right bead -> Close
up of right bead -> 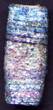
Left: Paper cut to 1" and cut at an angle; paper colored with
metallic green Marvy Marker; ends colors with a
silver leafing pen.
Right: Same as at left, except covered in clear beads and covered
with Perm Enamel
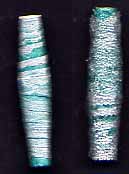 Close up of right bead ->
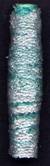
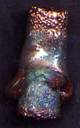
Decorative paper scraps, angle cut with 4 layers of Thick Embossing
Powder.
*HINT* The EASY way to add Thick Embossing Powder and heat without
burning your fingers:
Wrap and secure your bead as told above. Place bead on the tip of a
paintbrush handle and apply CLEAR embossing fluid. Dip the bead into your jar
of thick embossing powder.
Heat your bead with your heat tool to melt powder WHILE twisting the paint
brush.
While still hot, dip back into your embossing powder, take out and heat
again.
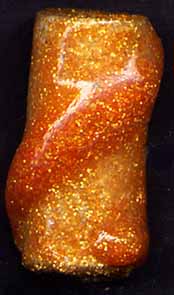
Faux Lamp Work Beads! (An original
idea, Wendy Kerr)
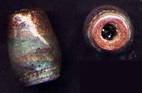 Close
up of bead -> Close
up of bead -> 
This paper bead looks almost exactly like a lamp work bead! It look almost
45 minutes to do, but is very pretty in person.
I started with a scrap of HEAVY ivory handmade paper, angle cut. Made as
usual, secure ends.
Roll onto a blue pearlescent Brilliance inkpad.
*Use hint above* Cover with *4* layers of thick embossing powder (or UTEE).
Roll into clear beads and heat to embed beads into melted powder. Add 2 more
layers of embossing powder.
Let cool for a moment then sparing sprinkle COPPER embossing powder onto your
bead and heat. It is important to remember to ROTATE your bead while heating.
Add copper embossing powder on end at a time and heat. Add 2 more layers of
CLEAR thick embossing powder. Set aside and let cool.
|