|
I’ve bought many rubber stamps in the past
but finding the costs and postage mounting up and also always wanting some
newer design to use in my artworks, I was happy when I found that I could
create my very own digital stamps (aka brushes). I
know not everyone has Adobe Photoshop or Paint Shop Pro, but if you have and
have never tried this as an extension to making images for you work, then you
may have found a new creative tool. Once you have got the simple basic steps
as set out below, there is no end to the experimentation to create your own
personal imagery you can use time and time again? I have also made a page of links
to other sites with Photoshop brushes (albeit more textural and grungy)
and a list of simple tutorials that I have been enjoying.
I have Photoshop6 for the PC and it is constantly in use for all my work.
It's an amazing program, and only limited by your imagination, a wonderful
tool for all artists, not only digital but with inkjet transfers with gel
medium, Lazertran and t shirt transfers, any prints
can be translated into real
material. Having way too much fun Gillian
Allen dec04
1 Open
an image and double click background (in the Layers Palette). This will make
into a transparent background layer. Layer 0
2 Adjust brightness / contrast, so that most or the midtones disappear
3 Then use the Threshold, (Image>Adjust>Threshold) this will
make it into a strong black and white image
4 Use the magic wand tool to select all the white areas. Zoom in and
hold the shift key down to select all the white pixels. Use Cut (Under Edit)
to cut away all the white pixels and will give you a transparent
background with the black image. This is your basic stamp
If you just want to make a simple stamp carry on to 5
Adding design details
You can leave it like this or add some more elements like type and
decoration. Experiment, try different ideas to make your own unique stamp
Add Type To do this create a new layer. Click type tool and get a nice
type face (some interesting typefaces can be found on my links
page) type in a word or short phrase and move to where you want. You may
change it to white type to show on the black areas and/or Rotate (Edit>
Transform> Rotate) to fit in with your design
Add a frame To do this, use the selection tool around your image, go
to Stroke (under Edit and specify the pixel width. Use undo or History to try
different thickness)
Add Design Elements. To do this, find an image with some interesting
pattern, or design. Crop the area you want to try, and then follow procedures
1 to 4 to get a transparent image. Paste this into your stamp and move around
to get the best position. You can enlarge or reduce its size by going to
(Edit> Transform> Scale). You may have to erase some areas so as not to
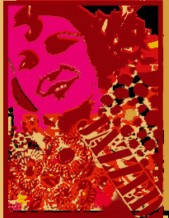
be confusing. It’s best to keep the images quite simple at first. I used some
areas from the Casino de Paris poster, the leopard spots and deco flowers
5. When you have your design, go to (Edit >Define brush) and name
your new stamp
6 Try the stamp out on a New page with a white background. Select the
brush tool and in the top left hand corner click on the black triangle. A pop
up menu appears where you can scroll down to the stamp you saved. Click on
your New paper and stamp. Try it  choosing
a different color from the color palette choosing
a different color from the color palette
Change the colors. Try different colored backgrounds. To do this, make
a new layer (no 2). and move it to the bottom, under
layer 1 and with the rectangle selection tool, on Layer no2 make a rectangle
over your stamp and fill with color
To make it look like a two or more colored inks printed, try this. Open New
with a transparent background. Stamp your stamp. In the Layers Palette,
double click and the Layer styles menu opens. Tick the Gradient box and
double click to open Gradient styles. Select a gradient and while open,
select the Move tool and on your stamp you can move the gradient how you
want. In this menu you can make adjustments to its size, angle and colors.
Have Fun, try different things, pattern and gradient overlays are also  options. options.
 You
can find some more info that will be useful at V
brush tutorials like how to organize your new brusPrint out your new original
stamps in the usual way, you can put as many on an A4 size paper as will fit.
Try using different papers such as vellum or parchment, watercolor paper, OHP
transparency film which you could layer over artwork. You can transfer them
using any of the methods here You
can find some more info that will be useful at V
brush tutorials like how to organize your new brusPrint out your new original
stamps in the usual way, you can put as many on an A4 size paper as will fit.
Try using different papers such as vellum or parchment, watercolor paper, OHP
transparency film which you could layer over artwork. You can transfer them
using any of the methods here
hes and using Paint Shop ProYou
can find some more info that will be useful at V
brush tutorials like how to organize your new brushes and using
Paint Shop Pro
|