|
· Polymer Clay Shoe Earrings |
From "Jewelry Making" |
|
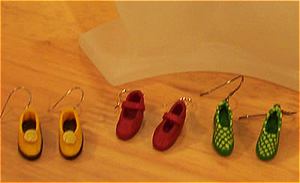
Polymer clay artist and author Deborah Anderson shares a technique
that will help satisfy your craving for more shoes -- by creating shoe
earrings! Materials:
Paper |
|
|
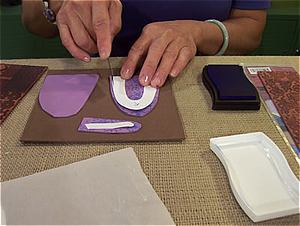
1. Condition 1/4 block
of pastel orchid clay by kneading and rolling through a pasta machine. After
it is soft and pliable, roll it through the pasta machine to a medium-thin
setting and place the sheet on an index card. 2. Ink up the stylus
mat with indigo ink. Place the pastel orchid sheet of clay on top of the
inked stylus mat, then place a piece of parchment
paper on top. Burnish so that the design will transfer onto the clay evenly. 3. Separate the clay
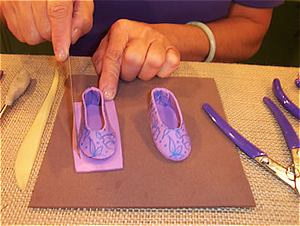
from the stylus mat carefully and let the ink dry. 4. Cut shoe template
using the Nublade and craft knife for the curved
part. Place it on top of the patterned sheet of clay and cut out the shoe
template for both the right and left shoe (figure A). 5. Fold over the seams
and press together for each shoe. These are the "uppers". 6. Place conditioned 1/4 of a block
of the black clay on the uppers on top of the black sheet of clay and cut
them out using the Nublade. |
figure A |
|
7. Roll out another sheet of black
clay on the medium thin setting and place the sheet on top of the textured
side of the sole material (figure B). Then place the parchment paper
on top of the clay and burnish so that the texture will transfer evenly. 8. Make two loops with the plastic
coated wire. Trim excess with wire cutters. 9. Place the loops under both shoes
on the heel part. 10. Place the shoes on top of the
black sheet textured side down. Trim excess clay. 11. Place both shoes on part of the
black sheet textured side down for the heels and trim excess clay. Use the
modeling tool to smooth the edges of both shoes. 12. Place the shoes on
an index card and place on a cookie sheet. Bake in an oven at 265-275 degrees
for one hour. Let cool. Attach the ear wires onto each loop of each shoe. RESOURCES: Metal
(Pewter, Copper) Rub-n-Buff, Fun Wire |
Colorbox Stylux Molding Mat and
Ancient Page Ink Pad, available from: Classy Clay GUESTS: |